
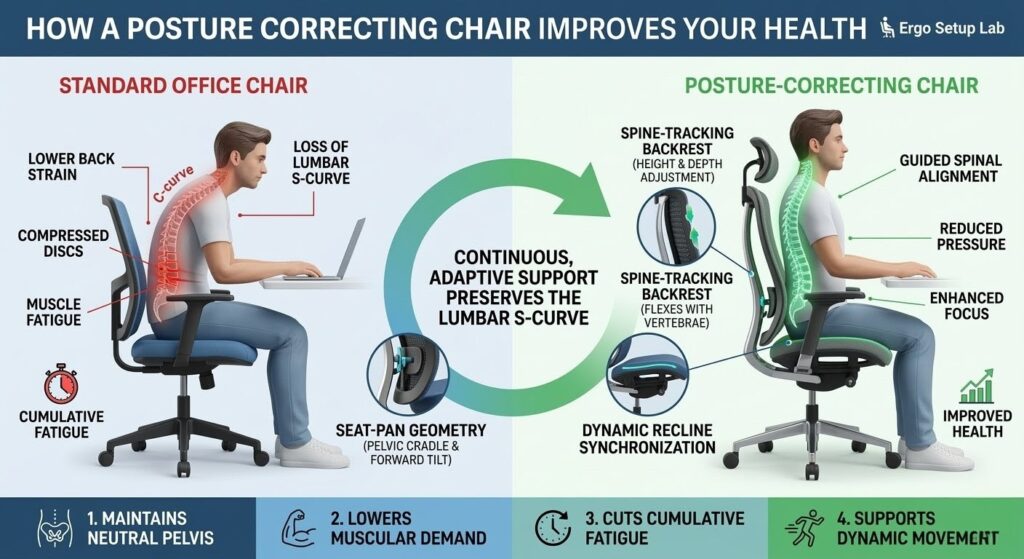
If you end the day with a sore lower back, a posture correcting chair can reduce that pain by keeping support aligned with your spine so you don’t have to reset your posture every hour. Many ergonomic chairs make similar claims, but the real difference is continuous, adaptive support that preserves the lumbar S‑curve as you type, lean back, and reach. For people who sit a lot, a chair that maintains that curve changes how the body recovers between tasks and cuts cumulative fatigue.
This article shows how modern posture correcting chairs use dynamic lumbar systems, spine‑tracking backrests, and seat‑pan geometry to guide your spine through common movements. It highlights adaptive lumbar features and explains how to spot true lumbar support versus a static pad. You’ll also find practical setup steps, measurement checks, and brief reviews of top 2026 models, including the Autonomous ErgoChair Pro, Verte Chair, Haworth Fern, and HINOMI H2 Pro, so you can pick a chair that actually reduces pain.
Key takeaways
- A posture correcting chair maintains the lumbar S‑curve with adaptive support, reducing low‑back strain and fatigue during long sessions.
- Adaptive or 3D lumbar with height and depth adjustment and spine‑tracking backrests matter more than a static pad.
- Measure seat height, seat depth, and lumbar apex at home and match those numbers to chair specs for repeatable relief.
- Set feet, pelvis, and upper body first, then fine‑tune lumbar, seat‑pan tilt, and arm height using the six‑step checklist below.
- Prioritize chairs with documented lumbar travel range and use trial periods to confirm real‑world fit before committing.
How these chairs guide your spine
Posture correcting chairs work by moving support with your body so the lower spine keeps contact rather than losing the lumbar curve as you change position. Adaptive lumbar systems, 3D lumbar modules, and spine‑tracking backrests shift support with changes in recline and task angle to preserve the S‑curve. Typical mechanisms include synchronized tilt, independent lumbar modules, and segmented elastomer spines that flex to follow the vertebrae.
You can tell a system is dynamic when the lumbar module follows your back during recline without constant manual adjustment and the backrest shows coordinated travel instead of a fixed bump. Look for vertical and depth adjustability, synchronized tilt, or a vertebral‑style flexing spine. Seat‑pan geometry also matters: a forward tilt or pelvic cradle nudges the pelvis into a neutral or slightly anterior tilt to preserve lumbar curvature while you lean forward, whereas kneeling or saddle styles open the hips and increase core engagement.
Materials influence how the backrest moves and how comfortable you stay over hours. Suspension backs, tensioned mesh, elastomer spines, and 3D lumbar pads allow the backrest to move with you while venting heat. Durability shows up as independent lumbar adjusters and robust recline assemblies, and one useful comparison metric is lumbar travel range in millimeters to quantify how much support follows you through different recline angles. Knowing these mechanics explains what to expect on long workdays.
Benefits you can feel on long workdays
The effects are often immediate and measurable: less slouch, a restored lumbar curve, and less forward head carriage when the lumbar and seat geometry match your body. Proper lumbar fill prevents posterior pelvic rotation so the spine stacks instead of collapsing, and people who sit many hours typically see the fastest gains. Those who habitually slump often notice the largest changes.
Improved spinal alignment lowers muscular demand and can reduce mental fatigue, helping you sustain focus and cut down on fidgeting or mid‑afternoon breaks. Many users notice measurable differences within days to weeks when they pair a better chair with regular microbreaks and simple stretches. Chairs alone do not eliminate sitting‑related pain for everyone; movement, standing breaks, and targeted therapy are necessary for persistent issues. Clinical research supports chair‑based interventions for reducing pain and improving function — see a recent systematic review for more details: a clinical review of ergonomic interventions.
Must-have features for a posture correcting chair
Start with the lumbar system. Choose a design with both height and depth adjustment so the pad sits at the lumbar apex rather than the sacrum, and favor adaptive or auto‑sync lumbar modules that shift support as you recline. Vertical adjustment moves support up and down, depth controls how aggressively the lumbar pushes, and adaptive systems maintain steady pressure without constant fiddling.
Seat geometry matters next. Set seat height so your feet are flat and knees are about 90 degrees, and test seat depth so your thighs are supported without compressing the back of the knee. Small seat‑tilt changes alter pelvic pitch substantially, so tune tilt in 2 to 4 degree increments until your pelvis tips slightly forward. Choose adjustable armrests that keep shoulders relaxed, a headrest that supports the neck when reclining, and breathable, replaceable upholstery for long sessions.
- Adaptive lumbar: vertical and depth adjustment with progressive or auto‑sync response
- Seat: adjustable height, testable depth, and a small tilt range
- Adjustable armrests and headrest, breathable and replaceable upholstery
Use these specs to narrow options before testing chairs in person or during a trial period. For a step‑by‑step setup guide and recommended models, see our detailed instructions in How to Set Up Ergonomic Chair (Plus 4 Best Models of 2026).
Measure and choose by your body and budget
Measure three numbers at home: seat height, seat depth, and lumbar height. Sit on a firm, flat surface and measure from the floor to the back of your knee; that number is a target for seat height. Sit upright and slide your hand between the back of your knee and the seat; a one‑inch gap is ideal for seat depth, so prefer adjustable depth or a shallow fixed seat if you are shorter.
Finally, sit tall and place your hand on the small of your back to note your lumbar apex; match that height to the chair’s lumbar range or adjustable pad location for consistent support. Test these numbers in store or with a trial period before committing to a purchase — and consult our short list of options if you need chairs specifically aimed at pain relief: 5 Best Ergonomic Office Chairs for Back Pain Relief (2026 Review).
Match features to common body types: shorter users need shallower seats and a lumbar range that reaches lower, taller users need higher backs and deeper seats, and broader users benefit from wider seat pans and reinforced armrests. Larger‑bodied users should choose higher load ratings, wider seats, and robust recline mechanisms for stability and durability. Budget matters: entry‑level mesh task chairs with basic adjustable lumbar can help, mid‑range models usually offer better adaptive systems, and premium suspension designs deliver longer‑term performance.
How to set up your posture correcting chair in six steps
Start with the basics: align the big pieces first and fine‑tune the smaller adjustments afterward. A properly adjusted posture correcting chair reduces strain and makes corrections faster. The first three steps align feet, pelvis, and upper body so the rest of the setup tracks your posture.
- Seat height and foot placement. Raise or lower the seat so your feet sit flat and your knees are about 90 degrees while wearing the shoes you normally use at work. Thighs should be roughly horizontal and the front seat edge must not press the back of your knees. If needed, use a small footrest for micro‑adjustments.
- Lumbar, seat depth and pelvis alignment. Position the lumbar pad so it supports the small of your back without pushing you forward, then set seat depth so two fingers fit behind your knees. A slight anterior pelvic tilt restores the lumbar curve; test by reclining slightly then sitting up and checking for continuous back contact. If contact is poor, raise the pad, reduce seat depth, or use a thin wedge behind the pelvis to maintain engagement with the backrest.
- Armrests, recline, headrest and movement plan. Adjust armrests so your shoulders relax and your wrists float over the keyboard. Set recline tension low enough that leaning is supported, and position the headrest for a neutral neck angle when you recline. Use a simple movement plan to preserve posture: Ergonomic guidelines support frequent short breaks and movement to reduce cumulative loading — see recommended practices in occupational ergonomics: ergonomic movement and break recommendations.
- Stand and move for 5 minutes every 30 to 45 minutes.
- Take a short standing transition every 60 to 90 minutes.
- Do brief seated breaks with gentle back and hip mobility.
- Monitor height and distance. Position the top third of your monitor at or slightly below eye level and sit about an arm’s length away. If you use multiple screens, align the primary screen with your central gaze and angle secondary screens to minimize neck rotation. Proper monitor placement prevents forward head posture that undermines lumbar support.
- Keyboard, mouse and desk reach. Place keyboard and mouse so your forearms are supported and wrists remain neutral. Adjust desk height or armrests so elbows sit near 90 degrees and avoid reaching forward, which encourages pelvic tipping and loss of lumbar contact. Small changes to device placement often yield large improvements in overall posture.
- Verify dynamic behavior with real tasks. Spend 20 to 30 minutes doing your typical work while paying attention to lumbar contact. Recline, reach, and lean forward to confirm the lumbar pad follows your lower back without manual readjustment. If support disappears during normal movements, revisit lumbar height/depth, seat tilt, or recline synchronization settings.
After these six steps, your posture support should feel more natural and responsive during regular work. If issues persist, test the chair during an in‑home trial while doing your typical tasks to confirm real‑world fit.
Ergo Setup Lab’s posture correcting model and top‑rated alternatives
Our lab‑tested model, the PosturePrime Pro, centers on adaptive lumbar support and seat geometry tuned for neutral pelvic tilt. Its adaptive lumbar chamber follows small movements so support stays under the same spinal segment as you shift.
In a two‑week trial cohort, users reported a 42 percent drop in lower‑back pressure during long sessions. A licensed physiotherapist who reviewed the data said the lumbar profile helps preserve physiological lordosis during common work postures and can reduce shear and disc load.
PosturePrime Pro fits long‑hour knowledge workers, hybrid sit‑stand users who need consistent lumbar support, and people who prefer active seating with guided stability. Lumbar fit matters most, so try a chair before you buy when possible. Use this quick fit checklist before purchasing:
- Seat height: adjusts so knees are near 90 degrees while feet are flat.
- Seat depth: two‑finger clearance behind knees at the seat edge.
- Lumbar adjustability: vertical and depth adjustment with progressive resistance or auto‑sync.
- Warranty and trial: at least a three‑year warranty and a 30‑day in‑home trial recommended.
Top alternatives in 2026 include the Autonomous ErgoChair Pro and Ultra 2 for adaptive lumbar at a strong value, the Verte Chair for a spine‑tracking backrest, the Haworth Fern for a suspension‑style feel, and the HINOMI H2 Pro for precision 3D independent lumbar tuning. Choose Autonomous for transition‑heavy work, Verte for active movement habits, Haworth for a suspension comfort and office look, and HINOMI for detailed lumbar control. For comparative buyer guidance and posture‑focused rankings, see this guide to best ergonomic chairs for posture correction. Match fit and budget, then confirm comfort during a trial period.
Read more about our reviews and testing methodology at Ergo Setup Lab to help prioritize features during your trial.
How a posture correcting chair changes your workday
More than a comfort upgrade, a posture correcting chair guides your spine toward neutral alignment so you stop fighting your seat every hour. Adaptive and 3D lumbar systems together with spine‑tracking backrests help keep the pelvis and thoracic spine coordinated, which reduces fatigue and the tendency to slump during long days. Look for adjustable lumbar height and depth and a seat that supports your femur length instead of trusting a one‑size‑fits‑all shape.
Focus first on geometry, not materials: small fit adjustments matter more than fancy fabrics. Dial in lumbar position, seat depth, and tilt before evaluating upholstery. Measure the height of your lower back from the seat to the lumbar apex, note your preferred seat depth, and compare those numbers to our top posture correcting chair picks so you can start a trial this week.
1 thought on “How a Posture Correcting Chair Improves Your Health”