If you spend 8+ hours a day sketching, editing, and designing, building an ergonomic drawing tablet setup is not just a luxury—it is an absolute necessity for your career longevity. You likely already know the feeling: a stiff neck, a sharp pinch in your upper back (right between the shoulder blades), and a persistent, dull ache radiating across your shoulders by the time you close Photoshop or ZBrush. Traditional flat setups force you to hunch over your screen (known as “tech neck”), which puts immense, unnatural pressure on your cervical spine, muscles, and tendons.
Think about traditional painters and draftsmen. For centuries, they have used easels and angled drafting tables specifically to bring their canvas up to eye level and allow their arms to move freely. Yet, when we transitioned to digital art, we started placing our digital canvases completely flat on standard office desks.
But what happens when you try to prop up your tablet with stacks of books, old boxes, or flimsy iPad covers, only to find it sliding around while you draw? Most makeshift solutions on the market completely fail to provide the stable, angled pressure needed for professional digital art. If your screen is flat on the desk, it forces you to overextend your neck and flex your wrists at harsh angles, completely defeating the purpose of a good drawing tablet desk setup and often accelerating repetitive strain injuries (RSI) or carpal tunnel syndrome.
At Ergo Setup Lab, we know that ergonomics is never one-size-fits-all, especially for creatives. A true ergonomic drawing tablet setup solves this by providing a sturdy, adjustable incline. This allows your hand to rest in a natural drawing position, keeps your posture upright and relaxed, and prevents you from curling your spine into a “C” shape. Understanding how to set up a drawing tablet correctly can literally save your career from physical burnout.
In this comprehensive review, we have tested and selected the 3 best drawing tablet stands of 2026 designed specifically for digital artists. Whether you are looking for a highly adjustable base for your heavy 16-inch pen display to complete your ultimate drawing tablet desk setup,
Quick Top Picks: Best Stands for an Ergonomic Drawing Tablet Setup (2026)
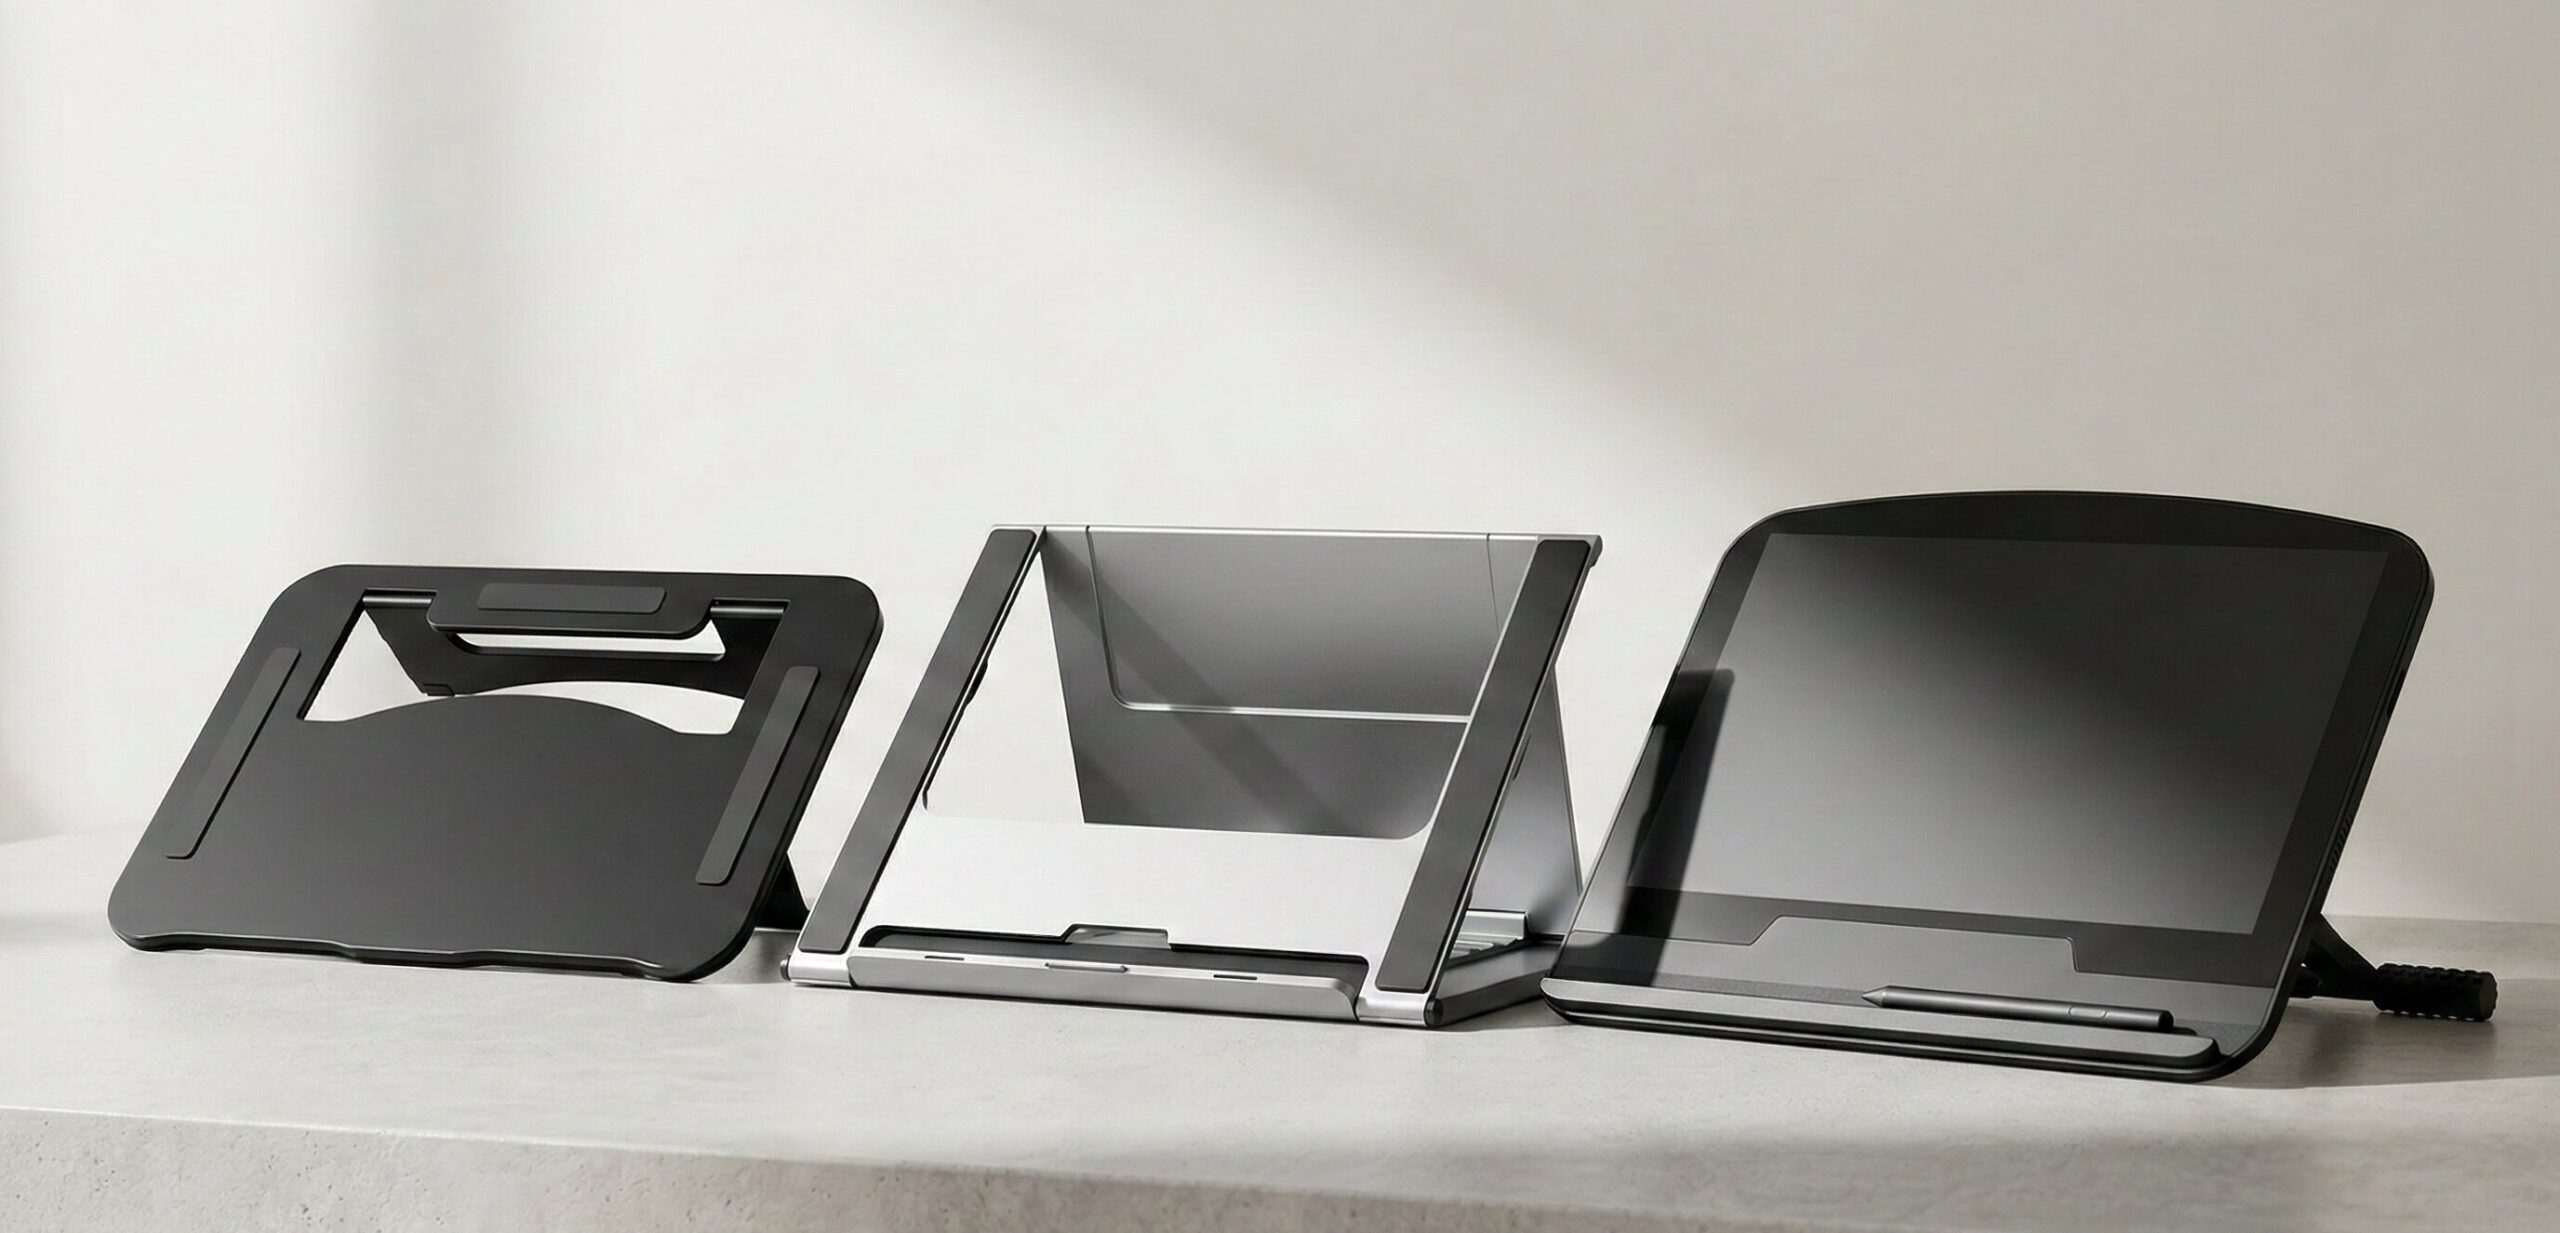
| Product Name | Product Image | Category | Main Feature | Buy Now |
| Parblo PR 100 |  | Best Overall | Universal Fit & Sturdy Build | 🛒Check Price on Amazon |
| HUION Adjustable Stand | 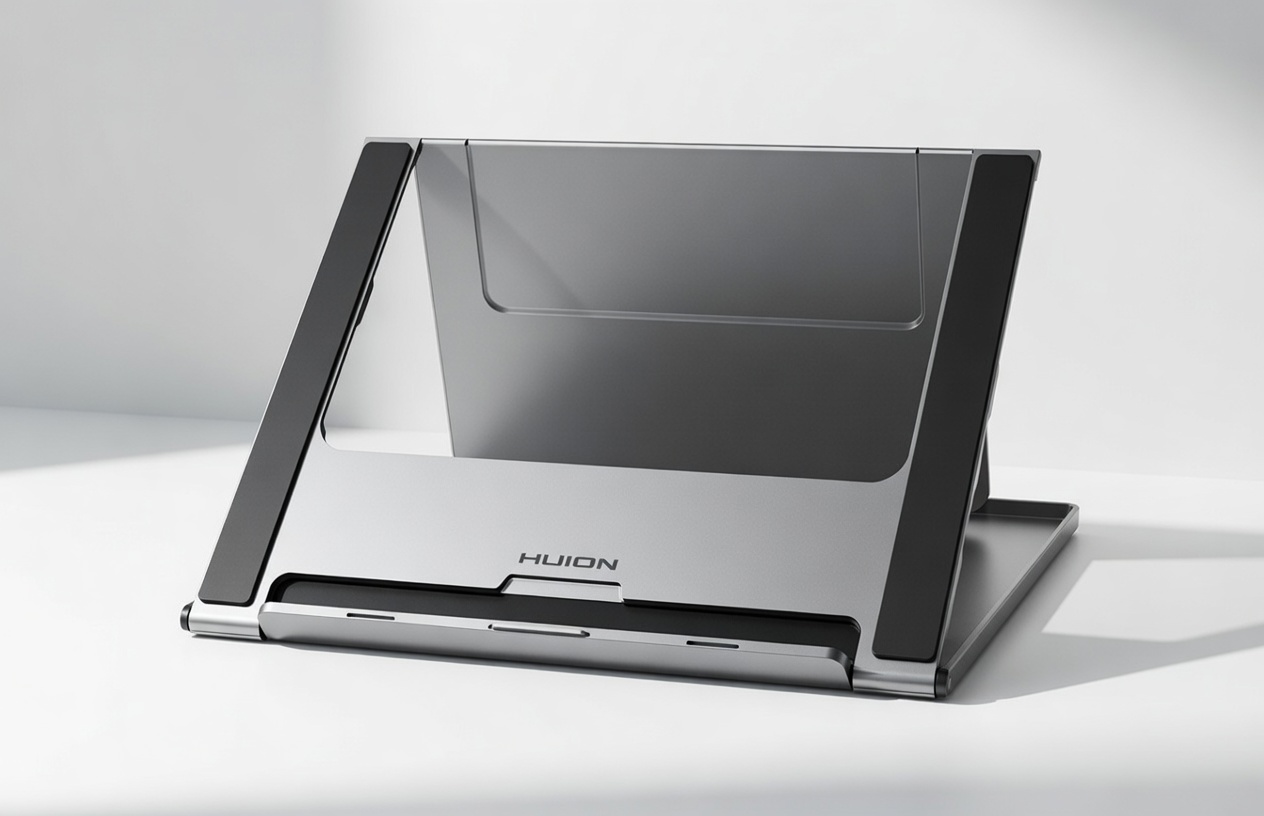 | Best Multi-Angle | Ultra-Portable & Foldable | 🛒Check Price on Amazon |
| XPPen Aluminum Stand | 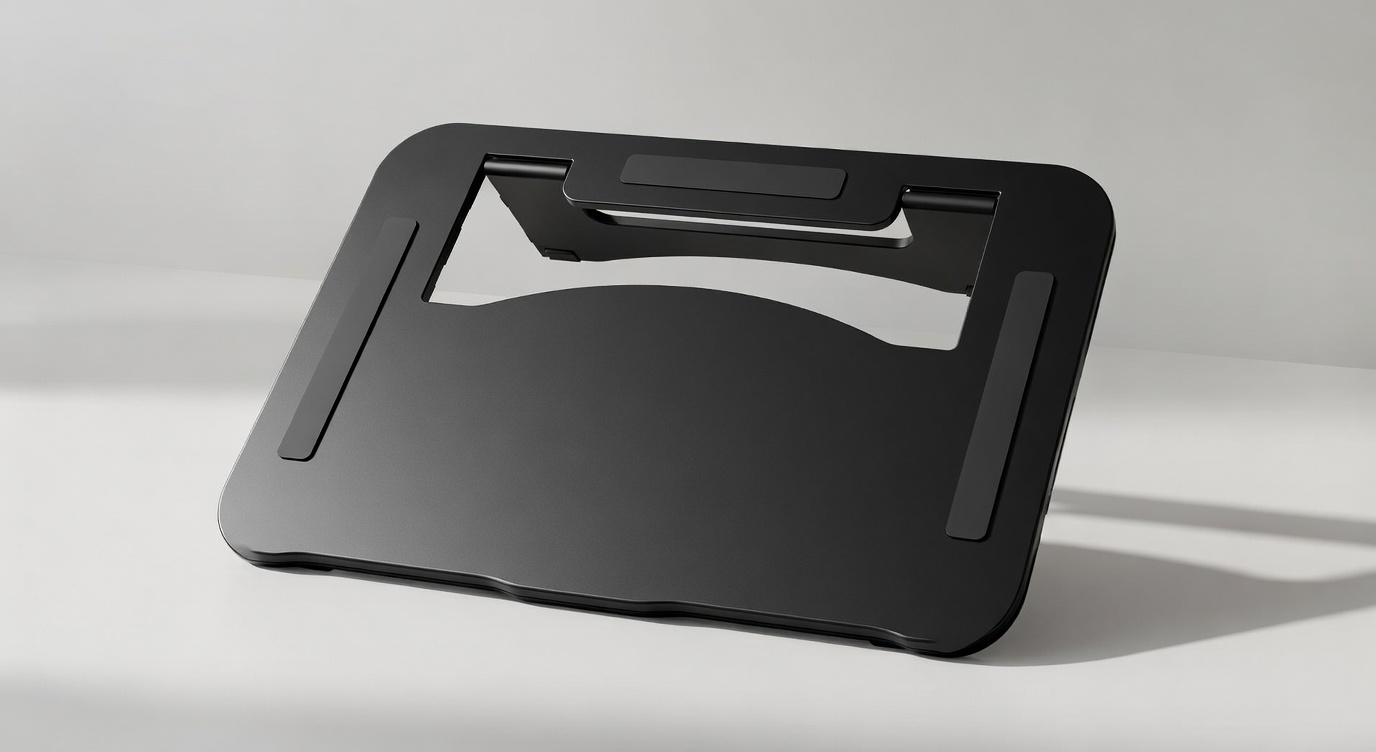 | Best Premium | Heavy-Duty Aluminum Alloy | 🛒Check Price on Amazon |
In-Depth Reviews of the Best Drawing Tablet Stands
1. Parblo PR 100 Universal Drawing Tablet Stand (Best Overall)
When it comes to building a reliable ergonomic drawing tablet setup, the Parblo PR 100 is the undisputed champion. Parblo took all the necessary features of a high-end drafting table and shrunk them down into a perfectly engineered, heavy-duty desk stand. It is a sturdy and intuitive stand crafted specially for tablets ranging from 10 to 16 inches, bridging the gap between small mobile tablets and massive studio monitors.
Why It’s a Winner: The PR 100 features a unique adjustable mechanism offering fluid tilt angles from 15 to 90 degrees. This elevates your screen to give a feeling of immediate relief and sends a wave of comfort through your neck and upper back. The textured rubber grips and metal alloy core feel incredibly premium, meaning your tablet won’t wobble, even when you are aggressively hatching or applying heavy pen pressure for thick lines.
Furthermore, the open-back design acts as a passive cooling system. High-end pen displays generate a lot of heat, which can make your drawing hand sweaty and uncomfortable. The Parblo stand lifts the hot back-panel off your desk, allowing ambient air to keep the hardware cool. If you want the absolute best all-around drawing tablet desk setup, this is the gold standard.
Specifications:
- Angle Range: 15 to 90 degrees adjustable
- Material: Alloy metal core with a microfiber and silicone cover
- Compatibility: Universal (fits 10″ to 16″ tablets securely)
- Special Feature: High-friction rubber pads to prevent sliding on glass, wood, or smooth laminate desks.
Pros & Cons:
- ✅ Pros: Perfectly sized and weighted to hold heavy pen displays securely without tipping.
- ✅ Pros: Allows you to shift between upright viewing (for movies or typing) and active drawing angles seamlessly.
- ✅ Pros: Incredible build quality that absorbs pen pressure without shaking or vibrating.
- ❌ Cons: Slightly heavier than other plastic stands, making it less ideal for daily backpack travel.
- ❌ Cons: Takes up a bit more desk depth when set to the lowest, flattest angle.
Our Verdict: The Parblo PR 100 is an absolute triumph in ergonomic design. It perfectly balances stability, function, and posture support for digital artists who need a rock-solid foundation.
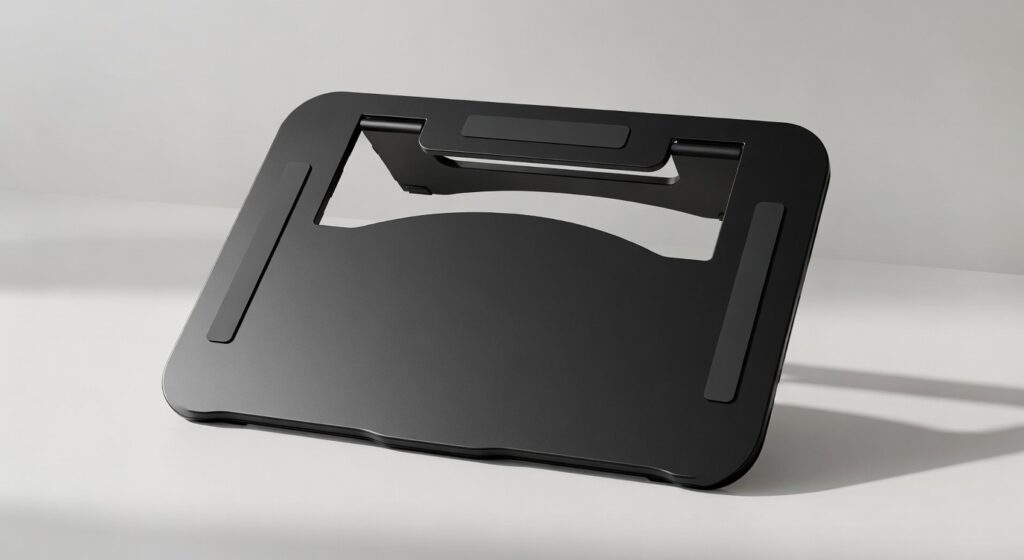
2. HUION Adjustable Multi-Angle Portable Desk Stand (Best Multi-Angle)
If you are an art student, a traveling freelancer, or simply someone who finds that traditional metal stands feel too bulky, the HUION Adjustable Multi-Angle Desk Stand (ST series) is going to be your best friend. This is a true portable base for an ergonomic drawing tablet setup that absolutely refuses to compromise on functionality and stability.
Why It’s a Winner: HUION specifically engineered this stand for users with Kamvas/Pro models, iPads, Samsung Galaxy Tabs, and other lightweight pen displays. It is incredibly compact and folds completely flat, resembling a thin hardcover book when packed away. This stand is ideal for users who want a versatile base that is easy to deploy in coffee shops, libraries, or on the couch, forcing your posture into a comfortable upright position while relieving shoulder fatigue.
The stand utilizes a clever slot-and-notch system. You simply lift the support leg and lock it into one of the designated grooves. It takes less than two seconds to set up, and the structural triangle it forms is surprisingly rigid, easily handling the weight of a resting arm.
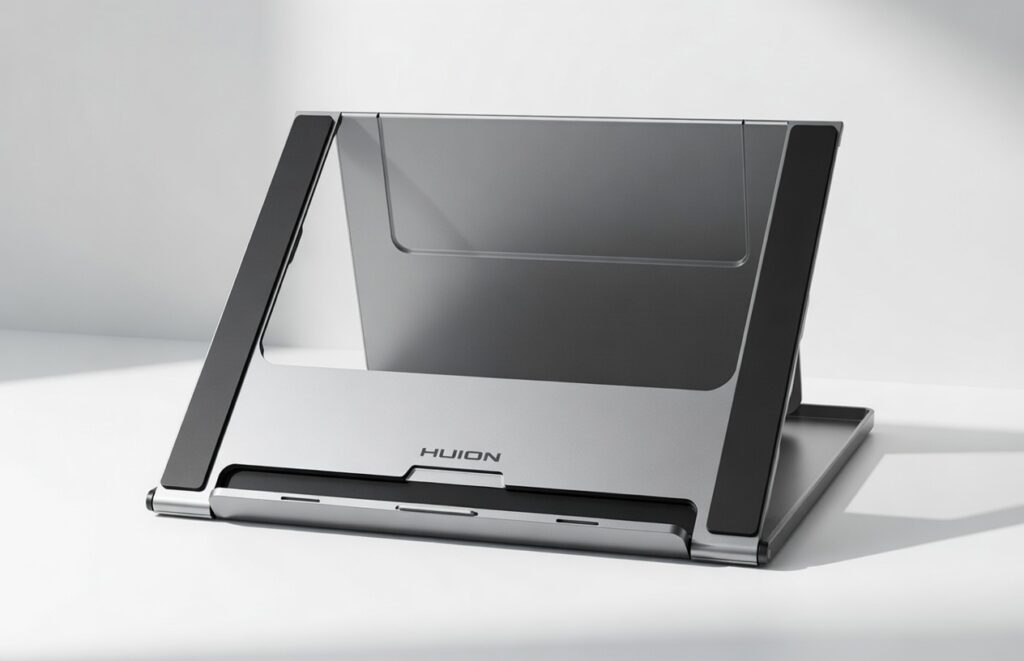
Specifications:
- Angle Range: 6 adjustable locking angles (between 14.5 and 45 degrees)
- Material: Lightweight aluminum and reinforced ABS plastic blend
- Compatibility: Ideal for displays under 15.6 inches and iPads
- Special Feature: True fold-flat footprint for exceptional portability and easy storage.
Pros & Cons:
- ✅ Pros: Unbeatable fit for traveling artists needing an ultra-low profile in their laptop bag.
- ✅ Pros: Highly portable, making it the perfect ergonomic travel companion for on-the-go sketching.
- ✅ Pros: Very budget-friendly compared to heavy-duty stands or built-in VESA arms.
- ❌ Cons: Max angle is 45 degrees, which might not be steep enough for pure monitor-style viewing.
- ❌ Cons: Not recommended for massive 22-inch+ heavy drawing monitors due to the narrower footprint.
Our Verdict: A lifesaver for mobile creators. If working at coffee shops or commuting leaves your neck strained, this HUION stand will fix your posture perfectly without adding bulk to your bag.
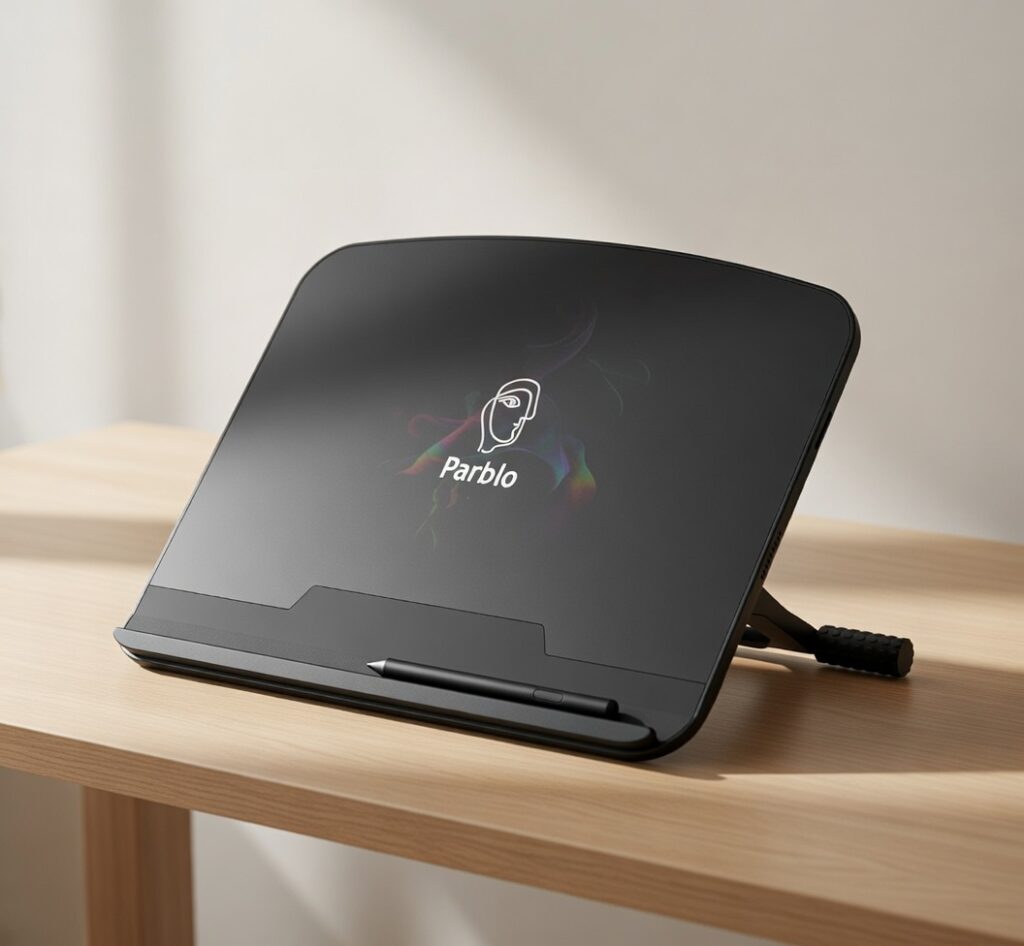
3. XPPen Aluminum Drawing Tablet Stand (Best Premium)
When severe neck pain strikes, you need serious, professional-grade equipment. The XPPen Aluminum Drawing Tablet Stand is widely recommended by professional illustrators and ergonomists as the ultimate heavy-duty drawing tablet desk setup.
Why It’s a Winner: XPPen created a sleek, minimalist stand made entirely of high-grade 5052 aluminum alloy. Its shape is strictly designed to reduce slouching and eye strain to allow you to draw more comfortably for extended, 10-hour workdays. It features an extra-wide bottom lip covered in anti-scratch silicone that prevents your expensive display from sliding off, even when applying maximum pen pressure during intense rendering sessions.
Unlike cheaper plastic stands that flex under the weight of your hand, the CNC-machined aluminum here is totally rigid. This means zero screen wobble, allowing for incredibly precise line art. Furthermore, the minimalist, metallic aesthetic matches beautifully with high-end tech setups, looking like a natural extension of a premium Mac or PC workstation.
Specifications:
- Angle Range: 10 to 65 degrees via a secure locking hinge
- Material: Premium 5052 Aluminum alloy
- Compatibility: Fits displays up to 16 inches securely, supporting substantial weight
- Special Feature: Superior heat dissipation design and anti-scratch silicone contact points.
Pros & Cons:
- ✅ Pros: Premium, aesthetic design looks incredible in any modern workspace or design studio.
- ✅ Pros: The solid aluminum build completely eliminates screen wobble, improving line accuracy.
- ✅ Pros: Outstanding heat dissipation so your screen doesn’t overheat your drawing hand.
- ❌ Cons: The premium aerospace-grade materials come with a notably higher price tag.
- ❌ Cons: Adjusting the angle requires a bit of force due to the purposefully stiff, heavy-duty locking mechanism.
Our Verdict: If you are actively suffering from neck strain or simply want a premium, wobble-free canvas that looks as good as it performs, this is the closest thing to professional drafting equipment for your modern desk.
Ergonomic Drawing Tablet Setup Benefits: Why You Need One
Understanding the core physiological benefits makes it clear why these stands are infinitely superior to keeping your tablet flat on the desk. Every professional drawing tablet desk setup should prioritize these factors:
1. Eliminates Neck Strain (Tech Neck)
Place your tablet flat on your desk and look down to draw. Within seconds, you will feel a slight tension in the back of your neck. Now, prop that tablet up to a 30-degree angle. That immediate release of tension is what an ergonomic drawing tablet setup provides. The angled surface reduces the need to bend your cervical spine, keeping the heavy weight of your head balanced over your shoulders rather than hanging forward.
2. Reduces Wrist and Shoulder Fatigue
Standard flat setups often force you to hover your shoulder or bend your wrist awkwardly (pronation and extreme extension) to make broad brush strokes. An angled drawing tablet desk setup allows your arm to rest naturally against the screen. Gravity works with you rather than against you, significantly reducing muscle tension to allow you to work more comfortably.
3. Prevents Device Overheating
Because an elevated stand lifts your display off the flat desk, it allows ambient air to circulate behind the device. This passive cooling keeps both your drawing monitor and your drawing hand cool during long rendering sessions, an essential component of a smart ergonomic drawing tablet setup.
4. Improves Line Confidence and Workflow
When your screen is flat, the viewing angle distorts your perception of proportions, and the friction of drawing from an awkward shoulder position leads to shaky, hesitant lines. Elevating the tablet allows you to draw from your elbow and shoulder with sweeping, confident motions.
How to Set Up a Drawing Tablet Ergonomically: Step-by-Step
During any workstation assessment, the most common question we get is: “How to set up a drawing tablet for maximum comfort?” It is not just about buying a stand; it is about how you integrate it into your workspace. Follow these steps to perfect your ergonomic drawing tablet setup:
Step 1: Adjust Your Chair Height First Before figuring out how to set up a drawing tablet physically, adjust your ergonomic chair so your feet are planted firmly on the floor. Your knees should be at a 90-degree angle. If your desk is too high and your feet dangle, use a footrest. A stable lower body provides the foundation for your upper body.
Step 2: Position Your Desk Setup Place your drawing tablet directly in front of you—not off to the side. Twisting your spine to draw is a fast track to back pain. In a proper drawing tablet desk setup, your primary drawing monitor should be dead center. If you use a second reference monitor, place it slightly elevated behind or right next to your drawing tablet.
Step 3: Set the Stand Angle Position your new tablet stand so the screen is angled roughly between 20 to 45 degrees, depending on your desk height and personal preference. Lower angles (20°) are great for active, heavy sketching, while steeper angles (45°) are better for light coloring and keeping your head entirely upright within your ergonomic drawing tablet setup.
Step 4: Check Your Arm Alignment When learning how to set up a drawing tablet correctly, remember that when your pen touches the screen, your elbows should rest at a comfortable 90 to 100-degree angle. You should not have to reach forward with fully extended arms to reach the center of your tablet.
Step 5: Place Your Keyboard and Shortcut Remotes For digital artists, keyboard shortcuts are life. Place your keyboard just above your tablet, or use a wireless shortcut remote positioned right next to your non-drawing hand. This finalizes your drawing tablet desk setup by preventing you from making repetitive, overextended reaches across your desk just to hit Ctrl+Z.
Buying Guide: What to Look For in a Tablet Stand
To ensure you buy the absolute best stand to complete your drawing tablet desk setup, keep these crucial purchasing factors in mind:
- Size and Weight Capacity: Always check if the stand can support your specific tablet size. A stand meant for a lightweight 13-inch iPad will collapse under the heavy weight of a 16-inch or 22-inch Wacom Cintiq or Huion Kamvas.
- Anti-Slip Features: Look for a stand with thick silicone or rubber grips on both the bottom feet and the tablet rest shelf. This secures your ergonomic drawing tablet setup by preventing your tablet from inching backward every time you press down.
- Angle Range: A good drawing tablet desk setup relies on adjustability. Look for a stand that offers multiple angles. Lower angles (15-30 degrees) are great for active drawing, while steeper angles (45-60 degrees) are perfect for using the tablet as a secondary monitor.
- Cable Management: Drawing tablets often require thick 3-in-1 cables that plug into the side or top. Ensure the stand you choose allows the wires to route cleanly behind the desk without tangling.
- Material Rigidity: Avoid thin, cheap plastics. When you draw, you apply localized pressure. If the stand is made of weak material, it will bounce and flex. Aluminum alloy or reinforced steel cores are always best for a professional ergonomic drawing tablet setup.
Frequently Asked Questions (FAQ)
1. Is it better to draw on a flat surface or an angle? Drawing on an angle is ergonomically superior. It prevents you from hunching over, which protects your neck and back, while also giving your eyes a more perpendicular, accurate view of the screen, greatly reducing visual parallax and screen glare.
2. Can I use a regular laptop stand for my drawing tablet desk setup? While you physically can, it is highly discouraged. Laptop stands are designed for static viewing and light typing, not for the constant, downward pressure of a heavy hand and stylus. True stands for an ergonomic drawing tablet setup have reinforced hinges and wider anti-slip lips specifically engineered for artists.
3. What is the best angle for an ergonomic drawing tablet setup? Most professionals prefer an angle between 20 and 40 degrees for sketching, line art, and sculpting. However, knowing how to set up a drawing tablet involves having an adjustable stand that lets you change the angle slightly throughout the workday to shift the load on your muscles.
4. Do I still need a stand if my drawing tablet comes with built-in fold-out legs? Yes, in most cases. The built-in legs on many pen displays usually only offer a single, very shallow angle (typically around 15 degrees). A dedicated stand gives your drawing tablet desk setup a much wider range of adjustability and far better structural stability.
5. How does a drawing tablet desk setup help with carpal tunnel? By allowing you to angle your screen, you reduce wrist extension (bending the hand backward). Keeping the wrist in a more neutral, straight alignment while you draw minimizes the compression of the median nerve, which is the primary cause of carpal tunnel syndrome.
Final Thoughts
Your physical health and creative longevity are irreplaceable. Ignoring back pinches and neck pain today leads to expensive physical therapy and forced breaks from drawing tomorrow. Investing in a proper ergonomic drawing tablet setup is an incredibly small price to pay for years of comfortable, strain-free creativity.
If you want the absolute best stability, universal fit, and heat dissipation for your studio, get the [Parblo PR 100 Universal Stand]. If you are a student or freelancer on the go who desperately needs a travel-friendly option, the [HUION Adjustable Stand] is an unbeatable value that fits right into your backpack.
Ready to upgrade the rest of your creative workstation? Check out our review of the [How to Set Up Ergonomic Chair] or see our guide to reclaiming your desk space with the [Best Dual Monitor Setup Ergonomic Mounts].
2 thoughts on “3 Best Stands for an Ergonomic Drawing Tablet Setup (Prevent Neck & Back Pain)”